The Easiest Fleece Blanket Ever!

This blanket makes a great gift! For a cut wrapping idea, cut a thin strip off of the blanket before cutting the strips and use it to wrap around the rolled up blanket and tie a bow, super cute!
You will need:
3 yards fleece fabric & a pair of scissors.
To make:
(Check out the pics below) At one corner, start at about 3 inches inwards. Cut a 3 inch line. Then, next to the 1st line cut about ¼ - ½ inch over cut another 3 inch strip. Continue doing this until you reach the end of that side of fabric, leaving about 3 inch access. Count the strips making sure you have an even number, this is VERY important! Then, cut a 3 inch square out of the corner and then continue cutting the fabric strips around the entire fabric blanket. It is not necessary to be super accurate with the cutting, if one strip is wider or longer it won’t be very noticeable. Next, starting at a corner take two strips and tie them together, making a semi-loose knot. Then, immediately tie a second knot on the same two strips, this time making it a tight knot. Continue tying knots moving around the entire blanket.


That’s it, no sewing!
Valentines Doily L-O-V-E Sign
This craft is super quick, super easy and super cheap! The 3 things I love in a craft, pun intended.

You will need:
Doilies* (I used small and medium sizes,); Glitter glue*; Glue stick; String or yarn (I used some yarn that I had); Scissors; Stickers* (optional)
*I got all these items from the Dollar Tree, but I’ve also seen them at other craft stores for cheap.

Directions: Use the glue stick on the front of the larger doily where you will place the smaller doily on top, then place the smaller doily on the larger doily making sure it is center. Use the glitter glue to draw one of each letter, spelling “love” or any other Valentines themed word. Next, place stickers on the doilies in various places, if using stickers. Then, cut the ribbon or yarn the length needed with a little extra, for wherever you are planning on hanging it. Weave the string or yarn in the top holes of the doilies. I use little Command stickers to attach the yarn to the top of my bookcase, tying a double knot and cutting off the extra. And, done!


Homemade Bird Brick

Ingredients:
1 cup peanut butter (crunchy is best)
1 ½ cups oatmeal (raw uncooked oats)
2 cups bird seed
½ cup water

Directions: In a large bowl combine peanut butter, oatmeal and water. Microwave for 3-5 minutes. The mixture will be very thick. Add in the bird seed and stir to fully combine. Pour ½ into a pie pan, or a medium square or round glass dish & press it down. Add the remaining ½ and press it down to form a solid mold. Put in the refrigerator to cool. Once it has hardened it is ready to be remove from the pan or dish. Wrap and tie a string around it and then tie it from a branch. You can place it on something outside like a deck railing, but then you run the chance of other creatures getting it. This recipe makes a very large brick, so if you want a medium or small brick just cut the recipe in half. This also is much cheaper than buying a bird brick from the store, just get super cheap peanut butter, the cheapest oats you can find and the 2.5 lb bird seed bag I found was only about $4 at walmart.
Lacey Christmas Trees

You will need:
 Paper or fabric doilies (If you use paper ones you will need to use 2-3 doilies per layer to make sure it is thick enough.)
Wall paper glue

Small painted brush
Foam trees / cones (I picked up 2 small & 1 large, for 3 trees total.)
Rubber gloves
Plastic bags, like a garbage bag or big shopping bag or can use wax paper or foil
 Wax paper
Tape
Scissors
Optional: Spray paint, glitter, ribbon or other decor to put on the trees.
Directions: Wrap the foam trees / cones in wax paper and tape it so that it is smooth. Place the trees / cones on a sheet of wax paper. Take the doilies and place with the back facing up on the plastic bag.
 Using the rubber gloves
brush a layer of the wall paper glue on the doily, immediately but gently put the doily on the cone / tree carefully wrapping it around folding in the extra to make a tree with a point on top (be careful to not tear the doily, they are easily torn when wet!) If needed, you can brush a little extra wall paper glue on the top to keep it together. It is okay for the bottom to not be level and it’s okay if they aren’t perfect and a little bumpy, they are homemade & that makes them unique! Once they are dry, which will depend on if they are paper not fabric. The fabric takes longer to dry, about a day.

The paper ones are a few hours. Gently remove the doilies from the cone wax paper and cut the bottom to make it level.
If you like this look then you’re done. Otherwise, you can use spray paint, glitter (I’d use glitter glue so it sticks or you can get spray on glue and sprinkle the glitter on), ribbon or other additional decorations.
 Another cool idea, would be if they are wide enough, you could use those electric candles for jack-o-lanterns and put them in the bottom of the trees to light them up, but I wouldn’t use a real candle.
Cinnamon Spray Painted Pinecones

What you will need:
Pinecones (I got mine from a park, because I don’t have a pine tree in my yard & didn’t want to buy the ones in the store, trying to save anywhere I can. Plus the one’s in the store have chemicals on them to smell like cinnamon instead of real cinnamon.)
Spray paint (any color you want, I’m using silver that is low VOC so it’s even more green.)

Cinnamon
Wax paper or foil
Optional: Glitter
Directions: Place pinecones on the foil or wax paper, standing up if possible and spray each with spray paint, make sure to spray a good amount on each one. However, you don’t need to completely cover them either. Keep in mind that once you sprinkle with cinnamon that will cover a lot of the pinecones, so they wont be as silver, there will be lots of brown from the cinnamon. Immediately sprinkle with LOTS of cinnamon, I can’t stress this enough you need lots of cinnamon. I bought a super cheap kind from Aldi for this purpose and used ½ the container. If you don’t use enough cinnamon then the cinnamon smell won’t be very strong, but they will still look pretty. If you are using glitter, sprinkle with the glitter. You can immediately spray a second coat of paint and sprinkle with more cinnamon if you want. Then let them dry on the sheet of wax paper or foil about 2 hours. When they have fully dried, you can put them in any decorative bowl or container, they look best in a clear glass container so you can see them easier.
Truly Simple Leaf and Burlap Wreath

You will need:
A wreath, plain is the goal (I used a stick wreath that was on clearance)
Burlap ribbon (had gotten this on clearance a few months ago)
Silk Leaves (I got a bag from the dollar tree)
Hot glue gun & hot glue
(optional) Fall flowers, ribbon in fall colors, twigs, acorns, pinecones, dried herbs or anything else you want to add.
Directions: There are 2 options you can use the burlap ribbon to dress the wreath. The first option, is to simply wrap it around the wreath overlapping a little so that way the wreath looks like it was made of burlap. This is how you would use the burlap if your wreath was a foam wreath, as you wouldn’t want to have the foam showing of course. The second option, is to bunch up the ribbon on the front and make little half bows or bumps with it, which is what I did. It is very simple, you just bunch it up like you are going to make one side to a bow, but instead of making the second half to the bow you secure the ribbon back down onto the wreath. There are many ways to do this, either with ribbon/thread, safety pins, or hot glue which is the quickest. You can make a bow out of the burlap, like I did if you desire to. i attached mine with tan thread.

Then, you add the leaves to the wreath with the glue gun sporadically, until you are happy with the way it looks. The idea is to make them look real, so try to incorporate them into the burlap ribbon so only part of the leaf is showing. I chose to make bunches of 2-4 leaves every few inches.
You, can also add the other items mentioned if you wish, such as twigs, pinecones, acorns, ribbon or my favorite the dried herbs, so it smells really good (keep in mind as time passes pieces of the herbs will fall off as it continues to dry). Be creative and have fun!
I had the burlap on the wreath from the Halloween one I made, so adding the two flowers and leaves only took about 10 mins. Fast and fabulous!
The Easiest Fleece Blanket Ever!
This blanket makes a great gift! For a cut wrapping idea, cut a thin strip off of the blanket before cutting the strips and use it to wrap around the rolled up blanket and tie a bow, super cute!
You will need:
3 yards fleece fabric & a pair of scissors.
To make:
(Check out the pics below) At one corner, start at about 3 inches inwards. Cut a 3 inch line. Then, next to the 1st line cut about ¼ - ½ inch over cut another 3 inch strip. Continue doing this until you reach the end of that side of fabric, leaving about 3 inch access. Count the strips making sure you have an even number, this is VERY important! Then, cut a 3 inch square out of the corner and then continue cutting the fabric strips around the entire fabric blanket. It is not necessary to be super accurate with the cutting, if one strip is wider or longer it won’t be very noticeable. Next, starting at a corner take two strips and tie them together, making a semi-loose knot. Then, immediately tie a second knot on the same two strips, this time making it a tight knot. Continue tying knots moving around the entire blanket.
That’s it, no sewing!
Valentines Doily L-O-V-E Sign
This craft is super quick, super easy and super cheap! The 3 things I love in a craft, pun intended.
You will need:
Doilies* (I used small and medium sizes,); Glitter glue*; Glue stick; String or yarn (I used some yarn that I had); Scissors; Stickers* (optional)
*I got all these items from the Dollar Tree, but I’ve also seen them at other craft stores for cheap.
Directions: Use the glue stick on the front of the larger doily where you will place the smaller doily on top, then place the smaller doily on the larger doily making sure it is center. Use the glitter glue to draw one of each letter, spelling “love” or any other Valentines themed word. Next, place stickers on the doilies in various places, if using stickers. Then, cut the ribbon or yarn the length needed with a little extra, for wherever you are planning on hanging it. Weave the string or yarn in the top holes of the doilies. I use little Command stickers to attach the yarn to the top of my bookcase, tying a double knot and cutting off the extra. And, done!
Homemade Bird Brick
Ingredients:
1 cup peanut butter (crunchy is best)
1 ½ cups oatmeal (raw uncooked oats)
2 cups bird seed
½ cup water
Directions: In a large bowl combine peanut butter, oatmeal and water. Microwave for 3-5 minutes. The mixture will be very thick. Add in the bird seed and stir to fully combine. Pour ½ into a pie pan, or a medium square or round glass dish & press it down. Add the remaining ½ and press it down to form a solid mold. Put in the refrigerator to cool. Once it has hardened it is ready to be remove from the pan or dish. Wrap and tie a string around it and then tie it from a branch. You can place it on something outside like a deck railing, but then you run the chance of other creatures getting it. This recipe makes a very large brick, so if you want a medium or small brick just cut the recipe in half. This also is much cheaper than buying a bird brick from the store, just get super cheap peanut butter, the cheapest oats you can find and the 2.5 lb bird seed bag I found was only about $4 at walmart.
Lacey Christmas Trees
You will need:
Paper or fabric doilies (If you use paper ones you will need to use 2-3 doilies per layer to make sure it is thick enough.)
Wall paper glue
Small painted brush
Foam trees / cones (I picked up 2 small & 1 large, for 3 trees total.)
Rubber gloves
Plastic bags, like a garbage bag or big shopping bag or can use wax paper or foil
Wax paper
Tape
Scissors
Directions: Wrap the foam trees / cones in wax paper and tape it so that it is smooth. Place the trees / cones on a sheet of wax paper. Take the doilies and place with the back facing up on the plastic bag.
brush a layer of the wall paper glue on the doily, immediately but gently put the doily on the cone / tree carefully wrapping it around folding in the extra to make a tree with a point on top (be careful to not tear the doily, they are easily torn when wet!) If needed, you can brush a little extra wall paper glue on the top to keep it together. It is okay for the bottom to not be level and it’s okay if they aren’t perfect and a little bumpy, they are homemade & that makes them unique! Once they are dry, which will depend on if they are paper not fabric. The fabric takes longer to dry, about a day.
The paper ones are a few hours. Gently remove the doilies from the cone wax paper and cut the bottom to make it level.
If you like this look then you’re done. Otherwise, you can use spray paint, glitter (I’d use glitter glue so it sticks or you can get spray on glue and sprinkle the glitter on), ribbon or other additional decorations.
Cinnamon Spray Painted Pinecones
What you will need:
Pinecones (I got mine from a park, because I don’t have a pine tree in my yard & didn’t want to buy the ones in the store, trying to save anywhere I can. Plus the one’s in the store have chemicals on them to smell like cinnamon instead of real cinnamon.)
Spray paint (any color you want, I’m using silver that is low VOC so it’s even more green.)
Cinnamon
Wax paper or foil
Optional: Glitter
Directions: Place pinecones on the foil or wax paper, standing up if possible and spray each with spray paint, make sure to spray a good amount on each one. However, you don’t need to completely cover them either. Keep in mind that once you sprinkle with cinnamon that will cover a lot of the pinecones, so they wont be as silver, there will be lots of brown from the cinnamon. Immediately sprinkle with LOTS of cinnamon, I can’t stress this enough you need lots of cinnamon. I bought a super cheap kind from Aldi for this purpose and used ½ the container. If you don’t use enough cinnamon then the cinnamon smell won’t be very strong, but they will still look pretty. If you are using glitter, sprinkle with the glitter. You can immediately spray a second coat of paint and sprinkle with more cinnamon if you want. Then let them dry on the sheet of wax paper or foil about 2 hours. When they have fully dried, you can put them in any decorative bowl or container, they look best in a clear glass container so you can see them easier.
Truly Simple Leaf and Burlap Wreath
Super Easy Plastic Pot Covers - Burlap with Ribbon
To cover those ugly plastic pots that flowers come in, I have a super easy and cute fall tip...unless you decide to plant the flowers it's not very pleasing to the eye looking at beautiful fall flowers like mums in ugly plastic pots. And, I don't know about you but, I don't have the money to spend on a bunch of nice plant pots. So, I have come up with a weather friendly and wallet friendly option. Burlap wrap with ribbon.

All you will need is a roll of wide burlap, I found mine at Michael's for about $5 it's 8" wide, big enough to cover the pots, and some ribbon in any color you like. I had some black sparkly ribbon, so I used that.
All you do is wrap the pot with enough burlap to cover up the plastic pot, then tie the ribbon around it to secure the burlap. Make sure to have enough extra ribbon to tie a nice bow for extra decoration, and that't it! No more eye sore.
Pumpkin Pals Craft
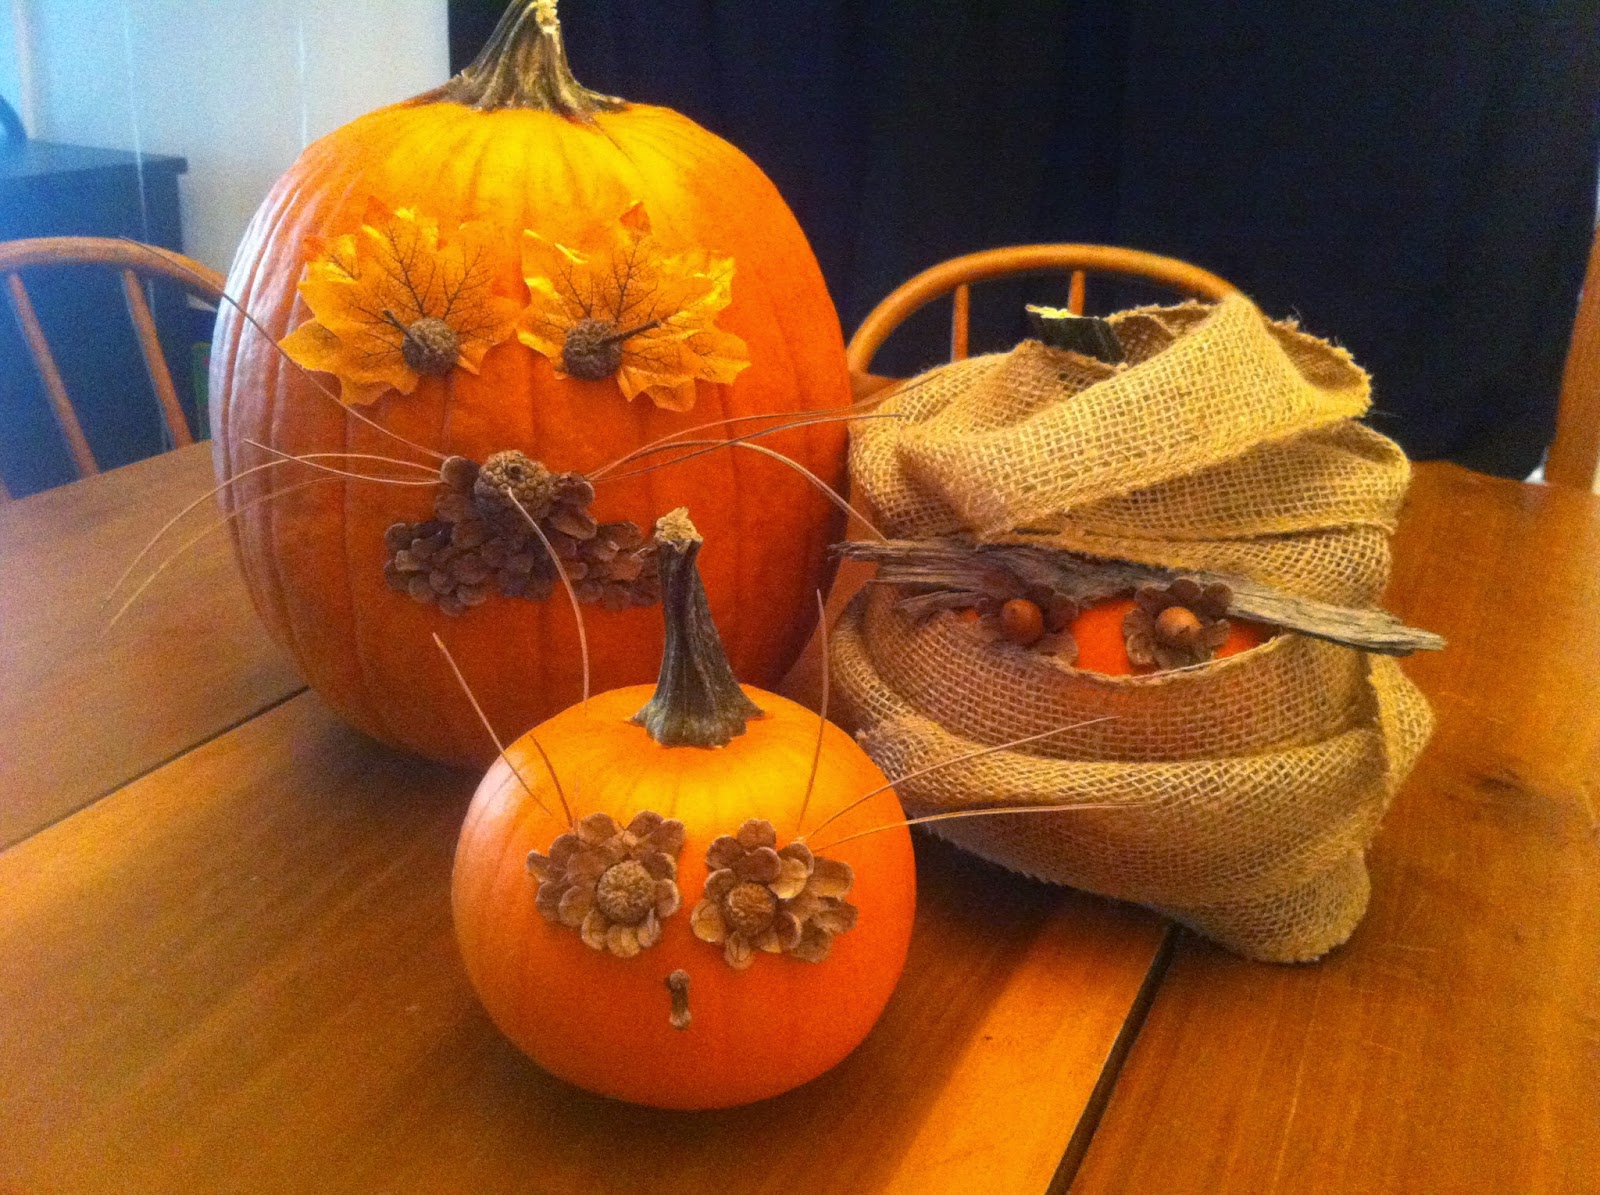

You will need pumpkins, a glue gun and glue, and pinecones, pine needles, acorns, twigs, bark or anything else you can find outside in your yard. I also used old burlap and a few silk leaves from the dollar store.

I made a lion, mummy and bird...of course you can create any creature you desire. The object of crafts is to be creative and have fun!

It took me about 45 minutes to make these three pumpkin creatures, including the clean up. To make them I just broke the pinecones apart and glued the pieces one at a time to the pumpkins in the desired placement along with the other natural materials I found outside.
Simple Wreath
I suggest investing in a simple wreath that you can easily update from season to season and from one holiday to another. I found a simple stick wreath on clearance and attached think burlap ribbon to it with a thick thread and needle, and secured the burlap ribbon in additional places with tiny safety needles. This almost plain wreath is super easy to change out any additional decorations to update any time of year. The idea is to keep it so simple that it only takes minutes to change out the extra decor...such as an old pumpkin scarf that I tied into a big bow.


For Thanksgiving, it will be super easy to remove the bow and quickly attach fall leaves with safety pins and maybe a ribbon...I will post those pics after halloween.
Pumpkin Craft

To get the most bang for your buck when it comes to pumpkins, it's best to not carve them, because that will cause them to rote quicker. Although, sometimes a good old fashioned pumpkin carving is just what we need to create beautiful memories. However, if you are looking for a few other ways to make pretty pumpkins on the cheap with very little effort, this post may be just what you are looking for.
To create the above designs there are a few options. The first is to pick up an application sticker set that is made for many different crafts. (I found mine on clearance for super cheap at Michael's).
The second option is to use a simple black sharpie marker. If you choose the second option them you will need to create a design on paper and poke through the paper onto the pumpkin just like you would a carving design. But, instead of cutting the design out, you just mark on top of the pokes with the black (or purple, blue, green, etc...) sharpie. {You can use black eye liner, acrylic paint with a small paint brush instead of the sharpie, but I found the sharpie is easiest to control.}

If you were able to find the pre-designed craft stickers, just simply apply in the design you want. I used one made of black jewels for a dark, antique type look. The big and the small round pumpkins have the black jewel stickers, that were pre designed.

The small pumpkin with the swirls made of dots was done with a black sharpie.
A third option, is to use acrylic paint (or sharpie) to write words on the pumpkins.

The great thing about being able to keep the pumpkins longer is, having the chance to redo the designs as often as you want (or have time) for different parties or themes. The important thing is to have fun!
No comments:
Post a Comment