Super Moisturizing & Anti-Aging Cocoa Face Mask

Ingredients:
1 tbsp Cocoa Powder
1 ½ -2 tbsp Greek Yogurt
Directions: Combine both ingredients together in a bowl starting with only 1 ½ tbsp yogurt. If to thick to stir and blend together add in another ½ tbsp yogurt. Apply to face gently with clean fingers and let sit / soak in for about 15 minutes. Then gently rinse off with warm or cool water, not hot water. Wash face after rinsing the mask off, while softly smoothing the mask off don't pull hard. You don't want to create wrinkles, the very thing that this mask helps to reduce and prevent! Keep extras in a container or covered in the frig for about a week. (There was enough for two masks covering my face, neck and chest area.)

Millions of women in history have used cocoa as part of their beauty regimen since it is very moisturizing. The Aztecs used it way back in the day; and it is still used in many cultures today. Cocoa has anti-aging properties from its Flavanols, which defend against inflammation causing free radicals. The less inflammation going on in and on the body the better, because inflammation causes a plethora of negative side effects including premature aging.
Longer Thicker Lashes (and Hair!)
I’ve noticed that as I’ve gotten older my lashes have also gotten thinner and shorter. Which I’m not happy about. I’ve taken vitamins to help get them to grow, and the vitamins have helped. But, not to my satisfaction. I heard about Shaklee’s ProSante Scalp Treatment that is working wonders on everyone’s hair. And, then I heard about how women are putting it into their mascara and how it has improved the length and thickness of their lashes. Which made me think, since I don’t wear mascara everyday and it would be hard to make sure you are getting an even amount from the mascara container. So, I just cleaned off an old mascara wand and poured some of the Shaklee ProSante Scalp Treatment into a little bottle (from the dollar tree) and dip the wand into the treatment. Then, tap it in the bottle to make sure I don’t get too much and waste it. Then brush it on my lashes after I’ve wash, dried and put lotion on my face at night. I have been doing this everyday for about 4 weeks, and have noticed a huge difference. Just after the first week I saw a lot more new growth and now it has filled in. Bonus: I use the ProSante Scalp Treatment on my scalp everyday too and have noticed a big difference with my hair being thicker and growing out quicker. Here are some pictures of before and after of my lashes (I didn’t take any before pics of my hair, sorry).

The above picture is before any treatment, besides my usual vitamins. (No make up either)

The above picture is 3 weeks after using the ProSante Scalp Treatment. You can see the lashes, especially the ones towards the left side (outside of my eye) have gotten longer and all the lashes have filled in thicker. (Again, no make up)
This next picture is before the lash treatment.

And, this pic shows the length after 3 weeks of the lash treatment. Look at the difference of how long the lashes fan out in the dark circles of my eyes (LOL)! They are much longer than compared to the before pic, the lashes in that pic didn’t reach as far out to the ends of the dark circles.

You can get the ProSante Scalp Treatment here: http://jberinger.myshaklee.com/us/en/shop/healthybeauty/prosantehaircare/product-_p_prosante-scalp-treatmentp?g=treatment
Fizzy Epsom Salt Bath Bombs or Foot Soaks

You will need:
1/8 cup water
2 cups epsom salts
5-7 drops of essential oil (I used eucalyptus and lavender with tea tree)
Silicone ice cube tray or candy mold tray
Bowl, spoon & as small a spoon as you have or the handle of a utensil.


Directions: Stir ingredients in a bowl using the larger spoon until fully combined. Scoop up a spoonful of the mixture the spoon used to stir and drop into the silicone mold. Pack tightly with either your your fingers or the small spoon pushing down, then add another scoop and pack it down. Continue adding a spoonful and packing it down until you've filled each mold in the tray to the top. rinse the small spoon or your fingers to wet them and press the top to really pack it down tight. Let it sit overnight to a few days. Turn the mold upside down and gently push on the silicone in to remove each cube from the tray. Keep in a jar or container.

Toss a few in some warm water and enjoy!!!
Peppermint Lavender Face Peel

This face peel is great for relieving tension and headaches. The lavender is calming and soothing, while the peppermint helps to clear the skin of excess oil, it also revitalizes and leaves you feeling refreshed. This is great for all skin types, from oil to dry.
Ingredients:
3 tsp Distilled Water
3 tbsp Coconut Oil, melted
1 drop Peppermint Essential Oil
1-2 drop(s) Lavender Essential Oil (I used my Lavender and Tea Tree Essential Oil)
Directions: Mix the essential oils with the coconut oil. Then add the water and stir. Put in the frig and let it sit just long enough for it to start hardening into a paste about 35-40 mins depending on how cold your frig is (parts of it will harden quicker than others so there may be areas of liquid oil still, but you can use it as long as there is enough hardened product to cover your face and neck if desired. Apply using clean fingers, by working little bits in circles on the face. The warmth from your face will melt the peel just a little, but it will harden again, as long as you don’t put too much on. Use it sparingly. Wait until the mask is dry before removing it, about 10-15 mins. Make sure to relax while this peel hardens, that’s an order, hehe. To remove it, peel it off gently and use water as needed to wash the rest of it off your face. You can also wash with face wash to fully cleanse the skin, which I would suggest. This makes enough for about 3 peels, you can store the extras in the refrigerator for up to 5 days.
Peppermint Lavender Body Spray (or room spray!)

Ingredients:
1 cup Distilled Water
1 1/2 tbsp Witch Hazel
7 Drops Lavender Essential Oil (I used my Lavender and Tea Tree essential oil)
6 Drops Peppermint Essential Oil
Directions: Add water and witch hazel to a small spray bottle and shake to mix them. Mixing the witch hazel with the water will help the essential oils to evenly disperse and keep them from settling at the bottom of the bottle. Then, add the essential oils and shake gently to blend. Make sure to shake it up gently before each use! I would suggest to keep it in the refrigerator, by keeping it cool it will make it even more refreshing.
The mixture of peppermint awakes you while the lavender soothes the skin, it’s a fantastic blend!
Dreamy Homemade Coconut-Almond Body Cream

Ingredients:
½ cup almond or olive oil
¼ cup coconut oil
¼ bees wax or aloe vera
2-3 drops almond extract*
2-3 drops coconut extract*
1 tsp vitamin E oil**
*You don’t need these, they are technically optional, but I suggest to use them so the cream is more fragrant.
**This will help the shelf life of the cream, but it is not necessary, so you can omit it if you don’t have it. However I suggest using it, because it also is moisturizing.
Directions: Put all ingredients in a glass jar. I used an old empty jam / jelly jar, but a mason jar or wide open top jar will work just as well. But, it needs to be glass not plastic. Place the glass jar with ingredients in a saucepan with about 2-3 inches of water in the saucepan. Put a lid on the jar, but loose, not tight. Place on stovetop over medium heat. Stir occasionally as the ingredients melt to combine them. Once, all the ingredients are blended fully together, remove from saucepan. You can either keep them in the glass jar you used to melt the ingredients or put them in another container, which can be plastic, metal or glass (I suggest glass). However, I wouldn’t put them in a pump container, because it is so creamy it won’t pump well if at all.
Keep in mind it’s not a lotion, it’s a cream, so a little goes a long way. It’s great for cracked hands in this cold weather, and for knees, elbows and feet, but all over body too!
Store at room temperature for about six months to reap the most moisturizing benefits. If you are concerned about mold or bacteria, you can add a few drops of eucalyptus essential oils or 100% witch hazel.
The Easiest Brown Sugar Body Scrub Ever!

Ingredients:
¾ cup brown sugar
⅓ cup olive oil (extra virgin or extra light)
2 tbsp honey (local is best)
¼ - ½ tsp almond oil (optional*)
Directions: Stir all ingredients together until completely combined. That’s it!
I suggest storing in a glass jar or container, but can use a plastic or metal container. You can go super inexpensive and use an old jam / jelly jar, which I do. I also suggest to refrigerate this scrub. It will last longer. I understand it’s hard to remember and inconvenient to take it out of the frig every time you want to use it. Which for me is every shower when I have this scrub made, because I have dry skin and it helps to scrub the old skin off so my lotion will soak in better. If not refrigerated it will last about a week, if refrigerated it will last about 3 weeks.
This scrub is great for all skin types not just dry, but normal and oily too. It leaves the skin smooth and helps remove the old dirt, oil and dead skin off the top layer / surface. Great for hands, feet, knees, and elbows!
*This oil will make it smell even more yummy and be more soothing to the skin. If you don’t have almond oil you can add a few drops of almond extract to get the smell, but it won't be as soothing as the oil.
Pear & Honey Face Peel
(I call this a face peel even though it feels more like a cooling mask, because of the way it naturally peels away the old dead skin cells from the surface of your face.)

Ingredients:
1 ripe pear
½ Tbsp honey
½ -1 Tbsp Almond milk (can sub. w/ coconut, rice or soy milk, but I wouldn’t use cows milk because you don’t need the heavy fat in it.)
Directions: Peel, core and chop the pear and place in a bowl. Mash the pear with a fork to get it chunky. Add the honey and almond milk. Use a fork or potato masher to combine the ingredients until they are a smooth texture like applesauce. Cover the bowl with plastic wrap or foil to seal and allow the mixture to fuze for about one hour.
This mixture makes enough for 2-3 peels depending on how much you apply. Store in a glass jar or container with a tight lid in the refrigerator for approx. a week.

To use: Apply mixture to face (and neck if desired) gently with your fingers. Leave on for about 10-15 minutes and rinse off with cool water, not warm/hot water. I would suggest not re-applying to face the following day, wait and use it every other day, only if needed.
*My skin is very dry and often when the weather changes I get redness on my checks. After just one use this face peel made my skin smooth and soft, and the redness vanished.

The above picture is before the face peel...
 and, this picture is after!
Pumpkin Hair Mask
Pumpkin has lots of vitamin A and potassium, and both are fantastic for your scalp. Plus, they help promote hair growth.

Ingredients:
- 2 cups pumpkin, canned or is fresh (if using fresh you need to cook it first. Place halved pumpkin, cut sides down, in a 350° oven for 1 to 2 hours or until tender. Cool, then scrape out the tender flesh with a spoon and mash; discard rind.)
- 1 Tbsp coconut oil, melted
- 1 Tbsp honey
- 1 -1 ½ Tbsp almond milk (can sub. coconut, rice or soy milk.)
Directions: Mix the pumpkin, coconut oil and honey until fully combined. Add in almond milk to create a smooth mixture. You can mix it by hand like I did, or use a blender or food processor.

This mixture makes enough for about 2-4 applications depending on how long your hair is and how much you use. Store in a glass jar or container if able, but you can also use a plastic container, just make sure it has a tight lid. Keep in refrigerator for up to a week.
To use: Apply to damp hair (it will soak into hair better) and cover your hair with either a plastic cap or plastic wrap to seal it in. Let is soak into hair for 10-15 minutes. Rinse hair until the mixture is fully out, then shampoo and condition as usual.
*My hair not only felt silky and softer after the hair mask, but the blond color of my hair was brighter and my hair was no longer dull, had a beautiful shine and overall looked healthier!

The picture above, right is before the hair mask, my hair was very blonde but getting dull and didn’t have much shine…
and, the picture below, left is after! (The lighting is different in the after pic, because I didn’t have natural sunlight anymore. It was after dark by the time my hair dried.)

Miracle Serum
As we age (especially us women) we tend to greatly dislike or even hate the deep wrinkles...

And, the saggy turkey neck...

One option is to inject toxins into our faces, to make you look like a blow fish...

For me, that is not an option! I want to be naturally beautiful and only use 100% natural products to achieve a youthful appearance. That is why I choose Shaklees Enfuselle skin care line. Specifically, the Firming Serum, which is a miracle in a bottle, that just so happens to be 100% natural, Yeah!
My mother was so gracious to allow me to put the serum on half her face and take pictures to see the difference. And, WOW, was there a difference in the fine lines, deep wrinkles and saggy neck. These pictures will prove it!

The above picture is with out.

This above picture is with only one application of the serum, which with every use improves the skin over time. As you can see the skin above the eye is firmer and less saggy, the wrinkles around the eyes are less noticeable, and some have disappeared.

The left side has the serum and the right does not. Again, the skin is firmer and the wrinkles are less noticeable and some have disappeared.

The above picture is with out the serum.
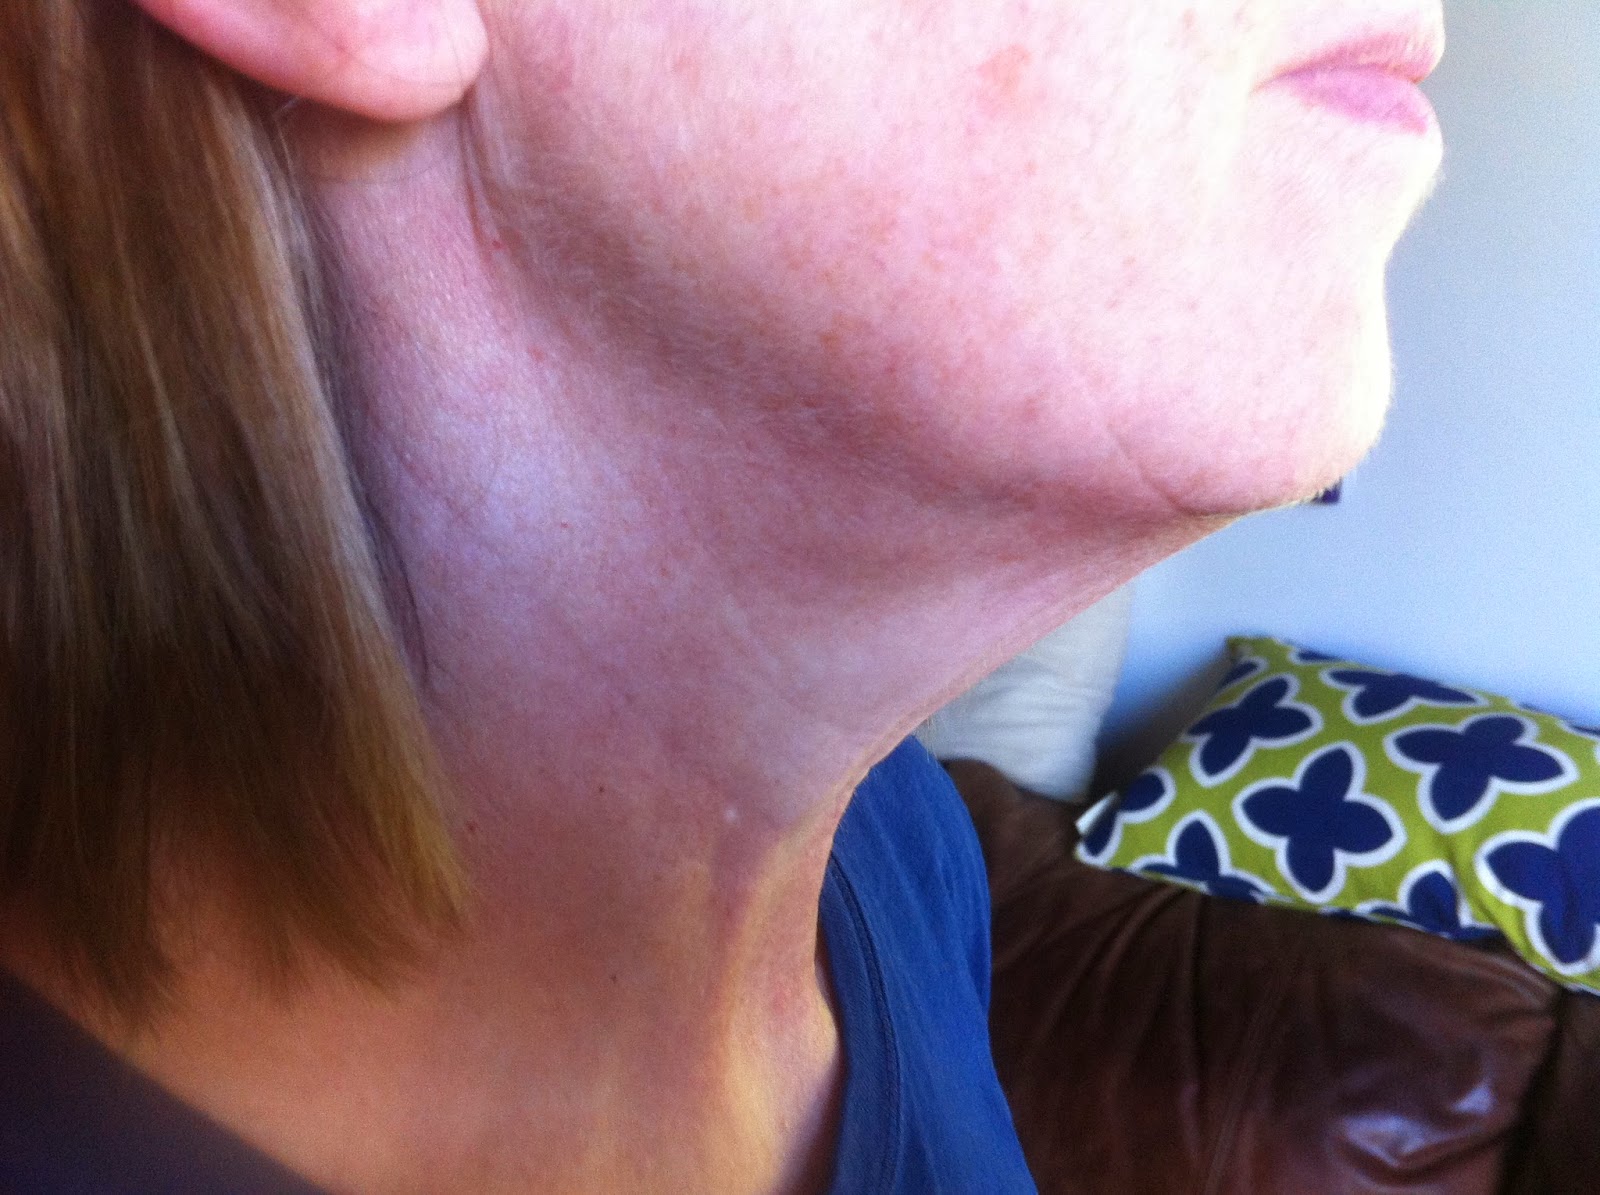
This above picture is with the serum. You can see the skin that hung below the neck is firmer especially the part to the sides that puckers out, in the picture with the serum it firmed up about 2 inches!

Being the kind person I am, I just couldn't keep this a secret, so I'm sharing it would all of you. If you are interested in trying this miracle stuff 100% money back guarantee from Shaklee. Meaning if you don't like it you get your money back no questions asked. You can buy the Firming Serum here:
Fluffy Pumpkin Body Scrub

You will need...
- 1/2 Cup Pumpkin: can use canned, fresh, or frozen (thawed) as long as it is pureed and a smooth texture
- 1/4 Cup Coconut Oil
- 1/2 - 3/4 Cup Brown Sugar
- 1/8 cup Olive Oil
Mix Pumpkin, Coconut Oil and Olive Oil together until fluffy. Add in the brown sugar, just enough to keep a fluffy texture while adding in the exfoliating sugar crystals. You can add in a few dashes of cinnamon &/or nutmeg is you desire to add a nice aroma.
Store in a large empty jam, jelly or mason jar. As this mixture sits it can separate, all that is needed is to stir the ingredients back together.

To use...
Apply the desired amount to skin and buff the skin to exfoliate and reveal beautiful soft glowing skin. If you have dry skin you don't need to wash after rinsing the scrub off, but if you have oily skin I'd recommend washing w/ a natural body wash.
*I use this about every other day all over my body, and everyday on my feet, elbows and knees to keep them soft.
Hope you enjoy!
No comments:
Post a Comment