Monday, October 27, 2014

Super Easy Plastic Pot Covers - Burlap with Ribbon

Super Easy Plastic Pot Covers - Burlap with Ribbon

To cover those ugly plastic pots that flowers come in, I have a super easy and cute fall tip...unless you decide to plant the flowers it's not very pleasing to the eye looking at beautiful fall flowers like mums in ugly plastic pots.  And, I don't know about you but, I don't have the money to spend on a bunch of nice plant pots.  So, I have come up with a weather friendly and wallet friendly option.  Burlap wrap with ribbon.


All you will need is a roll of wide burlap, I found mine at Michael's for about $5 it's 8" wide, big enough to cover the pots, and some ribbon in any color you like.  I had some black sparkly ribbon, so I used that.

All you do is wrap the pot with enough burlap to cover up the plastic pot, then tie the ribbon around it to secure the burlap.  Make sure to have enough extra ribbon to tie a nice bow for extra decoration, and that't it!  No more eye sore.

Creamy Butternut Squash Risotto

Creamy Butternut Squash Risotto

(This recipe is soooo yummy and dreamy!)


Ingredients:

Approx. 3 cups butternut squash, cubed

2 tbsp butter or coconut oil

½ onion, chopped

1 cup arborio rice

4 oz. can mushrooms (optional)

4 - 5 cups vegetable stock

¼ cup parmesan cheese, grated

1 tsp cinnamon

½ tsp nutmeg

½ tsp cumin

¼ tsp sea salt

¼ - ½ tsp black pepper

Directions: Steam the cubed squash in a steamer basket, with water in the main pot and cover with a lid.  Bring water to boil on medium to high heat.  Steam the squash for about 12-15 minutes or until tender.  Then carefully, mash the squash, but only a little (I like to leave about half in chunks.)  Over medium-high heat melt coconut oil or butter, add onion and cook until it is soft about 3 minutes.  Add rice, and cook while stirring, until the rice has a glossiness and the onion starts to brown a little, about 5 minutes.  Add ½ cup of veggie stock and stir, until it has been absorbed by the rice, about 3-4 minutes.  Then add in another cup of veggie stock, and cook while stirring until the rice has absorbed it, about 6 minutes.  And a third cup of veggie stock and stir while cooking until the rice has absorbed it, about another 5-6 minutes.  Then add in the squash, mushrooms, and one cup of veggies stock and stir.  Then add the parmesan cheese and seasonings.  Cook while stirring until the rice is soft and has absorbed most if not all the veggie stock.  You can add more veggie stock if desired, or if the rice is not fully cooked yet.  Serve warm.  
You can add a little more parmesan cheese if desired, but I don’t think this risotto needs anything else besides a side item.  I often make my baked chickpea patties and/or a steamed vegetable.
Makes 5 servings.

Approx. Nutrition facts:  Cals. 275   Carbs. 50g  Fat 7g   Protein 9g  Fiber 5g

Dark Chocolate Almond-Cherry Nuggets


Dark Chocolate Almond-Cherry Nuggets

Ingredients:
1.25 oz. (about six 1” squares) dark chocolate at least 73%, the darker the better!

10-12 (about 1.5 tbsp) dried cherries

1 tbsp sliced almonds, can use chopped instead

2 tsp flax seed, milled (can use a chia and flax seed blend)

dash or two of sea salt (optional)

Dark Chocolate Cherry-Almond Nuggets.jpg

Directions:

Melt chocolate, either in a sauce pan over medium heat or in microwave on 50% power for about 2-3 minutes.  Add in the remaining ingredients.  Stir until fully combined.  Scoop small half-spoon fulls and place on plate or in a container lined with wax paper.  Put in refrigerator for about 20 minutes or until hardened.  Makes about 5 nuggets.

They can be stored at room temperature or in frig. (I kept mine in frig.)

Approx. Nutrition Facts: Cals. 50   Fat 3.5g   Protein 1g   Carbs. 2.5   Fiber 1.5g

Holiday Survival Guide Nov wk 1 - Printables


Hopefully, using our creative help this month has made it easier for you to enjoy all the full fall festivities.  We will continue to offer you help in all the same areas in November that we did in October.  Starting with November printables to get you organizing and keep you on track in November, because we all know that November is usually even busier than October.  So, check out this weeks post, and keep coming back each Monday for more helpful tips for November!

And we've made it to the last week of October!   Hopefully you're nice and organized and well-planned and have been able to enjoy all the spooky festivities.  I know our family has enjoyed not having a last minute scramble for costume pieces, treats, and pumpkins.  Instead we've gotten to really enjoy the parties, decorating pumpkins, and getting to do all the fun things this Halloween entails.  So now it's time to set you up for the same sort of peace in November!  Today we're sharing a set of November Planning Printables.  We've also got your top links from last week's link party and a new, fresh link party for all your favorite printable and Fall fun!
Holiday Survival Guide 2014
We're going to get you decluttered, organized, cleaned, decorated, and ready for all the holiday fun...without you needing to be committed to the looney bin before New Year's.
It takes quite the team to pull this off, but we're here for you! We'll be here every Monday through the end of the year to make sure you're on track and able to enjoy everything you have planned.

Ready to meet the team?

Sheri from Career Girl Interrupted

Dani from Dani Schnakenberg Studios

Katie & Jairus from KatieMarcum.com

Jessica from Jessie Bee Healthy

Kristen from From Son Up Til Son Down

Stephanie from Sharing A to Z

and our lovely co-host Amanda from It's a Fabulous Life

Each week we'll take turns bringing you something awesome to help you stay on track preparing for the major Holidays of the season. Be sure to come back and link up your holiday posts each week so we can share the fun!


November Planning Printables

Click Here to Download

Now, who's ready to party? Share your Fall and Thanksgiving-inspired posts with us this week!

Link Party Rules:

  1. Follow all hosts: subscribe, FB, Pinterest, Instagram, Twitter...whatever you prefer!
  2. Be sure to link directly to your specific post, NOT your blog's homepage.
  3. Don't link and run! Be sure to visit the last couple links before yours and let them know how you found them through #HolidaySurvivalGuide2014!
  4. By linking up, you give all hosts permission to pin and share your projects (with links back to you, of course). We'll also be sharing the top three clicked through with each following week's project!
  5. Be sure to follow the Holiday Survival Guide 2014 Pinterest board, too!

Top links from last week:

1. Five for Fall…PLUS Fall Home Tour! - The Road to Domestication

  Five for Fall | TheRoadtoDomestication.com

2. Recycle Broken Malibu Lights for the Holidays from Life With Lorelai

Recycled Broke nMalibu Lights for the Holidays

3. Christmas on a Budget: Tasty Gifts from Little Blog on the Homestead

Christmas on a Budget: Tasty Gifts

Monday, October 20, 2014

Holiday Survival Guide 2014 - October wk 4 - Natural Beauty Regimens

     This week we have some scary-inexpensive crafts and all natural yet simple beauty regimes to help your hair and skin glow almost as bright as all the light up costumes and decorations.  So, after you've finished carving your jack-o-lanterns, and cleaned up the mess that carving makes.  Take some "me" time to help you feel beautiful, knowing that you are using 100% natural beauty products.  Have a Happy and Safe Halloween!

Welcome to the fourth week of the Holiday Survival Guide 2014! This week we're talking spooky Halloween crafts and delicious self-care recipes (because you deserve some me-time after all this hard work)! We've also got your top links from last week's link party and a new, fresh link party for all your awesome crafts and DIYs!

Holiday Survival Guide 2014

We're going to get you decluttered, organized, cleaned, decorated, and ready for all the holiday fun...without you needing to be committed to the looney bin before New Year's.
It takes quite the team to pull this off, but we're here for you! We'll be here every Monday through the end of the year to make sure you're on track and able to enjoy everything you have planned.

Ready to meet the team?

Sheri from Career Girl Interrupted

Dani from Dani Schnakenberg Studios

Katie & Jairus from KatieMarcum.com

Jessica from Jessie Bee Healthy

Kristen from From Son Up Til Son Down

Stephanie from Sharing A to Z

and our lovely co-host Amanda from It's a Fabulous Life

Each week we'll take turns bringing you something awesome to help you stay on track preparing for the major Holidays of the season. Be sure to come back and link up your holiday posts each week so we can share the fun!

From our friend Kristen:

It's OCTOBER!!! My favorite month of the year!! The air is crisp, the nights get a little chilly and the world is ablaze with color. It just feels like everything is alive! One of my favorite holidays comes in October... Halloween!!!

Kid-Friendly, Budget-Friendly Halloween Crafts

I'll be sharing with you some craft ideas for your Halloween Shindig!! I don't know about you, but come this time of year I start to buckle down on the spending. I have just had to buy my oldest a whole new wardrobe as he has out grown every item of clothing- UGH!! So I thought I would come up with some cheap, easy and kid-friendly crafts for Halloween. I tried to also use items from around the house whenever possible.

MUMMY MASON JAR Mummy Jar Craft GHOSTLY MILK JUG Ghostly Milk Jug Craft SCARY EYES Scary Eyes Craft

When you're done crafting with the kids, it's time for some relaxing "Me-Time"! So how about trying these delicious beauty DIYs from our friend Jessica:

Pear Honey Face Peel

Pear Honey Face Peel

Pumpkin Hair Mask

Pumpkin Hair Mask

Now, who's ready to party? Share your Halloween-inspired crafts, printables, and activities with us this week!

Link Party Rules:

  1. Follow all hosts: subscribe, FB, Pinterest, Instagram, Twitter...whatever you prefer!
  2. Be sure to link directly to your specific post, NOT your blog's homepage.
  3. Don't link and run! Be sure to visit the last couple links before yours and let them know how you found them through #HolidaySurvivalGuide2014!
  4. By linking up, you give all hosts permission to pin and share your projects (with links back to you, of course). We'll also be sharing the top three clicked through with each following week's project!
  5. Be sure to follow the Holiday Survival Guide 2014 Pinterest board, too!

Top links from last week:

1. The Gift of Time - Monthly Dates from Little Blog on the Homestead

The Gift of Time - Monthly Dates      

2. The Girl's Got Power Tools! Pumpkin Gutter from Life With Lorelai

Pumpkin Gutter

3. Cranberry Pistachio Biscotti from Mom Among Chaos

Cranberry Pistachio Biscotti


Pear & Honey Face Peel


Pear & Honey Face Peel

(I call this a face peel even though it feels more like a cooling mask, because of the way it naturally peels away the old dead skin cells from the surface of your face.)

honey pear fc peel.JPG

Ingredients:
1 ripe pear
½ Tbsp honey
½ -1 Tbsp Almond milk (can sub. w/ coconut, rice or soy milk, but I wouldn’t use cows milk because you don’t need the heavy fat in it.)

Directions: Peel, core and chop the pear and place in a bowl.  Mash the pear with a fork to get it chunky.  Add the honey and almond milk.  Use a fork or potato masher to combine the ingredients until they are a smooth texture like applesauce.  Cover the bowl with plastic wrap or foil to seal and allow the mixture to fuze for about one hour.

This mixture makes enough for 2-3 peels depending on how much you apply.  Store in a glass jar or container with a tight lid in the refrigerator for approx. a week.

pear-and-honey1.jpg

To use: Apply mixture to face (and neck if desired) gently with your fingers.  Leave on for about 10-15 minutes and rinse off with cool water, not warm/hot water.  I would suggest not re-applying to face the following day, wait and use it every other day, only if needed.

*My skin is very dry and often when the weather changes I get redness on my checks.  After just one use this face peel made my skin smooth and soft, and the redness vanished.


b4 peel.JPG


The above picture is before the face peel...


after peel.JPGand, this picture is after!

Pumpkin Hair Mask


Pumpkin Hair Mask

Pumpkin has lots of vitamin A and potassium, and both are fantastic for your scalp.  Plus, they help promote hair growth.

pumpkin coconut hair mask.JPG

Ingredients:
  • 2 cups pumpkin, canned or is fresh (if using fresh you need to cook it first.  Place halved pumpkin, cut sides down, in a 350° oven for 1 to 2 hours or until tender. Cool, then scrape out the tender flesh with a spoon and mash; discard rind.)
  • 1 Tbsp coconut oil, melted
  • 1 Tbsp honey
  • 1 -1 ½ Tbsp almond milk (can sub. coconut, rice or soy milk.)

Directions: Mix the pumpkin, coconut oil and honey until fully combined.  Add in almond milk to create a smooth mixture.  You can mix it by hand like I did, or use a blender or food processor.


pumpkin-face-mask.jpg


This mixture makes enough for about 2-4 applications depending on how long your hair is and how much you use.  Store in a glass jar or container if able, but you can also use a plastic container, just make sure it has a tight lid.  Keep in refrigerator for up to a week.

To use: Apply to damp hair (it will soak into hair better) and cover your hair with either a plastic cap or plastic wrap to seal it in.  Let is soak into hair for 10-15 minutes.  Rinse hair until the mixture is fully out, then shampoo and condition as usual.

*My hair not only felt silky and softer after the hair mask, but the blond color of my hair was brighter and my hair was no longer dull, had a beautiful shine and overall looked healthier!


b4 hair mask.JPG


The picture above, right is before the hair mask, my hair was very blonde but getting dull and didn’t have much shine…

and, the picture below, left is after! (The lighting is different in the after pic, because I didn’t have natural sunlight anymore.  It was after dark by the time my hair dried.)


after hair mask.JPG

Sunday, October 19, 2014

The Easiest 5 Day Mini-Cleanse / Detox


The Easiest 5 Day Mini-Cleanse / Detox


I have done Shaklee's 5 day mini cleanse  / detox a few times and every time I feel amazing on it!  The first time I did it I lost about 5 pounds.  The second time I did it i lost another 4 pounds, even though I didn't have any weight to really loose.  I did the detox because I feel it is important to cleanse our bodies of all the junk that it gets clogged up with, plus this detox gives me a ton of energy.  You are able to eat unlimited raw veggies, have 3 delicious smoothies that are as filling as a meal, plus 2 snacks.  Yes! You get to eat food on this cleanse!  I eat just as many calories on this detox as I usually do when I'm not detoxing.  About 1200-1300 calories per day, if you weight more than 175 lbs you would up that to 1400-1600 calories per day. 

If you are interested in doing the 5 day min-cleanse you can get all the items you will need from Shaklee below.


You will need to also get organic lemons for water & lots of veggies.

(A great tip while detoxing / cleansing if you don't think you will be able to pass the temptation of other foods in the house, put them either in a box and super tape it up, so it would take more than 5 minutes to get into it {in the garage, basement or attic} or in the freezer so you'd have to thaw it before you could eat it.  Hopefully, these tips will help, but if not then give it away or toss it.  But, anyone can do this easy detox for 5 days!)

Wednesday, October 15, 2014

Pregnancy to One Year, How to Keep Mom and Baby Healthy!


Pregnancy to One Year, How to Keep Mom and Baby Healthy!

This video is a bit long, just over an hour, but it is full of great information from how to control blood sugars and healthy weight gain, to caring for your baby and creating a toxic free home.  Plus, how to increase milk supple and loose the baby weight the healthy way.


You can purchase any of the items talked about in the video here: http://jberinger.myshaklee.com
And, of course if you have any questions, please feel free to email me at jberinger.myshaklee@gmail.com

Naturally Healthy Bodies - Pro and Prebiotics

Naturally Healthy Bodies - Pro and Prebiotics

The cold season has shown it’s ugly face and hopefully so far you have made it without catching any bugs.  If you haven’t been so lucky, hopefully this will keep you from catching another one.  It’s super important to increase our immune systems this time of year and the best way to do that is by supplements.

Because, 70% of the cells in our immune system are found in our gut, according to John Hopkins Medical Center and numerous other doctors and medical sources.  The easiest way to improve our immune system is by a taking a pre and probiotic.  You need both to get the full benefits they each offer.

More importantly, you and your family, should be using a high quality one.  Otherwise, you are wasting your hard earned money on nothing.  I use Shaklee’s Opliflora Pre & Probiotics, because they are designed to be digested in your gut, which is where they need to be in order to work their magic.  You can find them here http://jberinger.myshaklee.com/us/en/shop/healthysolutions/digestive/product-_p_optiflora_p_.  I am not telling you that you need to only use Shaklee’s, however theirs is the only kind I fully trust.  Because they do over 263 quality tests and the have the only speciality coating to make sure that it gets to your gut, unlike all the other kinds I’ve tried.

If you choose to go to a local health food store, just be aware that not everything in there is what it says it is.  Most people think that because it’s from a health foods store its a higher quality, but that simply isn’t true.  The FDA does not monitor vitamins and supplements like they do food.  And, let’s face it even food is lacking in monitoring now a days.  On the other hand, Shaklee tests every ingredient in their products for over 350 contaminates to guarantee that they are the utmost quality.

So, in addition to our already healthy diet and vitamins, I suggest to start taking a pre and probiotic.  Bonus: they also help keep you regular!

Organizing the Spice/herb Cabinet

Organizing the Spice/herb Cabinet

Tip 1. I don’t know about you, but I hate it when I’m cooking and I’m out of or too low of a spice/herb I need.  To keep this from happening I have organized my spice/herb cabinet and taped up a little note so I can add spices/herbs to the list as I use them and notice they are low.

Tip 2. Even with a great system to keep the spices fully stocked, sometimes I/we drop the ball.  If this happens to you, there are certain spices/herbs you can substitute.  For example, oregano can be swapped for basil and vs. versa, or cinnamon and cloves for nutmeg and vs. versa.  Sometimes, this works out even better and you find that the replacement spice(s)/herb(s) make the dish better than the original spice(s)/herb(s).  But, sometimes they don’t work and you end up wasting your time and effort. Oh darn...

Tips 3.  Obviously the best solution is to not have this happen, by making sure you always has the spices/herbs you need on hand.  Especially, if it’s a family favorite recipe and everyone is looking forward to filling their tummies with your fantastic creation (like on Thanksgiving when your home is filled to the brim with hungry family and friends); my suggestion to keep you on track and reduce some unnecessary stress during the hectic holidays (which are stressful enough).  Would be to make sure to replenish spices/herbs once they are no less than ¾ empty.  

Tip 4.  I have slowly been transitioning my spices/herbs to Simply organic and get them from http://www.iherb.com/.  On this site they are less than half the price of the non-organic cheap spices/herbs at the grocery store.  Plus, iHerb usually processes and ships the orders the same day and if you order $20 or more you get free shipping, awesome!  (iHber.com also has a bunch of other awesome items that I purchase often.)

Tip 5.  How to organize your spices/herbs.  I realize it’s nice to have the spices/herbs close to the stovetop for quick add-ins while cooking or baking, but spices/herbs are not suppose to be stored near warm/hot places, like the oven/stove top.  I keep my spices/herbs above the kitchen sink in a small cabinet.  I organized my spices/herbs by flavor, so if I feel adventurous, I can add-in similar spices/herbs that might just make the dish even better.  Plus, often when making a dish they require similar spices/herbs, which makes it faster to just grab them if they are next to or close to each other.  For example, hot spices are stored together like red pepper and chili powder, or sweet spices are stored together like cinnamon and nutmeg, and herbs are stored together like basil and oregano.


I hope this helps you with your cooking/baking this holiday season and throughout the year!  Because by taking a little time now to get organized will help you in the long run when you are even busier as the holidays continue to get closer.

Tart Cherry Protein Bits

Tart Cherry Protein Bits


Ingredients:

½ cup dried tart cherries (you can sub. raisins or cranberries)

1 scoop (about 3 tbsp) protein powder (I used Shaklee 180 Chocolate Smoothie Mix)*

3 tbsp chopped walnuts (you can add more to up the protein, if desired)

1 tbsp chia & flaxseed mix (I use Garden of Life - organic golden Flax & Chia seed** but or you can add ½ tbsp of each chia & flax seed separately)

2 tsp cinnamon

2-3 tbsp almond milk (can sub. rice, coconut, soy or cow’s milk)

1 tbsp dark or semi-sweet chocolate chips (optional)

Directions: Soak cherries in enough water to fully cover them for one hour, this will help ekkp them moist for easier mixing.  Chop cherries in a food processor, or you can cut them by hand into 1/4’s.  Combine cherries, protein powder, flax and chia seed mix with almond milk, make sure it’s completely blended.  Add the remaining ingredients.  Scoop hand or spoonfuls of the mixture and roll into approx. 2” balls.
Makes approx. 6 bits/balls.

To store: Refrigerate for a week to a week and a half.

Nutrition Facts:***
Cals. 65   Fat 2g   Carbs. 10g   Protein 3g   Fiber 2g

**You can get the flax & chia seed mix at http://www.iherb.com/
***Approx. nutritional value depending on ingredients used, such as protein mix.

Monday, October 13, 2014

Holiday Survival Guide 2014 Oct week 3 - Crafts & Printables!

If you've loved the last two posts of our Holiday Survival Guide 2014, you are going to love this week just as much! This week is about crafts. So, spook up some creativity and have a monstrous fun time. And, for a bonus this week, you get more fantastically frighting printables. Enjoy!

Welcome to the third week of the Holiday Survival Guide 2014! This week we've got some scarily fun printables to share! We've also got your top links from last week's link party and a new, fresh link party for all your your awesome Halloween posts!

Holiday Survival Guide 2014

We're going to get you decluttered, organized, cleaned, decorated, and ready for all the holiday fun...without you needing to be committed to the looney bin before New Year's.
It takes quite the team to pull this off, but we're here for you! We'll be here every Monday through the end of the year to make sure you're on track and able to enjoy everything you have planned.

Ready to meet the team?

Sheri from Career Girl Interrupted

Dani from Dani Schnakenberg Studios

Katie & Jairus from KatieMarcum.com

Jessica from Jessie Bee Healthy

Kristen from From Son Up Til Son Down

Stephanie from Sharing A to Z

and our lovely co-host Amanda from It's a Fabulous Life

Each week we'll take turns bringing you something awesome to help you stay on track preparing for the major Holidays of the season. Be sure to come back and link up your holiday posts each week so we can share the fun!
This week we've got a set of spooky Halloween-themed printables from Sheri at Career Girl Interrupted!

Halloween Printables from CareerGirlInterrupted.com

(Click HERE or on the image above to download all the PDFs in a .zip file.)

Now, who's ready to party? Share your Halloween-inspired crafts, printables, and activities with us this week!

Link Party Rules:

  1. Follow all hosts: subscribe, FB, Pinterest, Instagram, Twitter...whatever you prefer!
  2. Be sure to link directly to your specific post, NOT your blog's homepage.
  3. Don't link and run! Be sure to visit the last couple links before yours and let them know how you found them through #HolidaySurvivalGuide2014!
  4. By linking up, you give all hosts permission to pin and share your projects (with links back to you, of course). We'll also be sharing the top three clicked through with each following week's project!
  5. Be sure to follow the Holiday Survival Guide 2014 Pinterest board, too!

Top links from last week:

1. Reeses Cake from From Son Up Til Son Down

Reeces Cake

2. Pumpkin Spice Syrup from Life With Lorelai

Pumpkin Spice Syrup from Life With Lorelai

3. Mini Gluten-Free Pumpkin Cheesecakes from The Road to Domestication

Mini Gluten-Free Pumpkin Cheesecakes from TheRoadtoDomestication.com

Friday, October 10, 2014

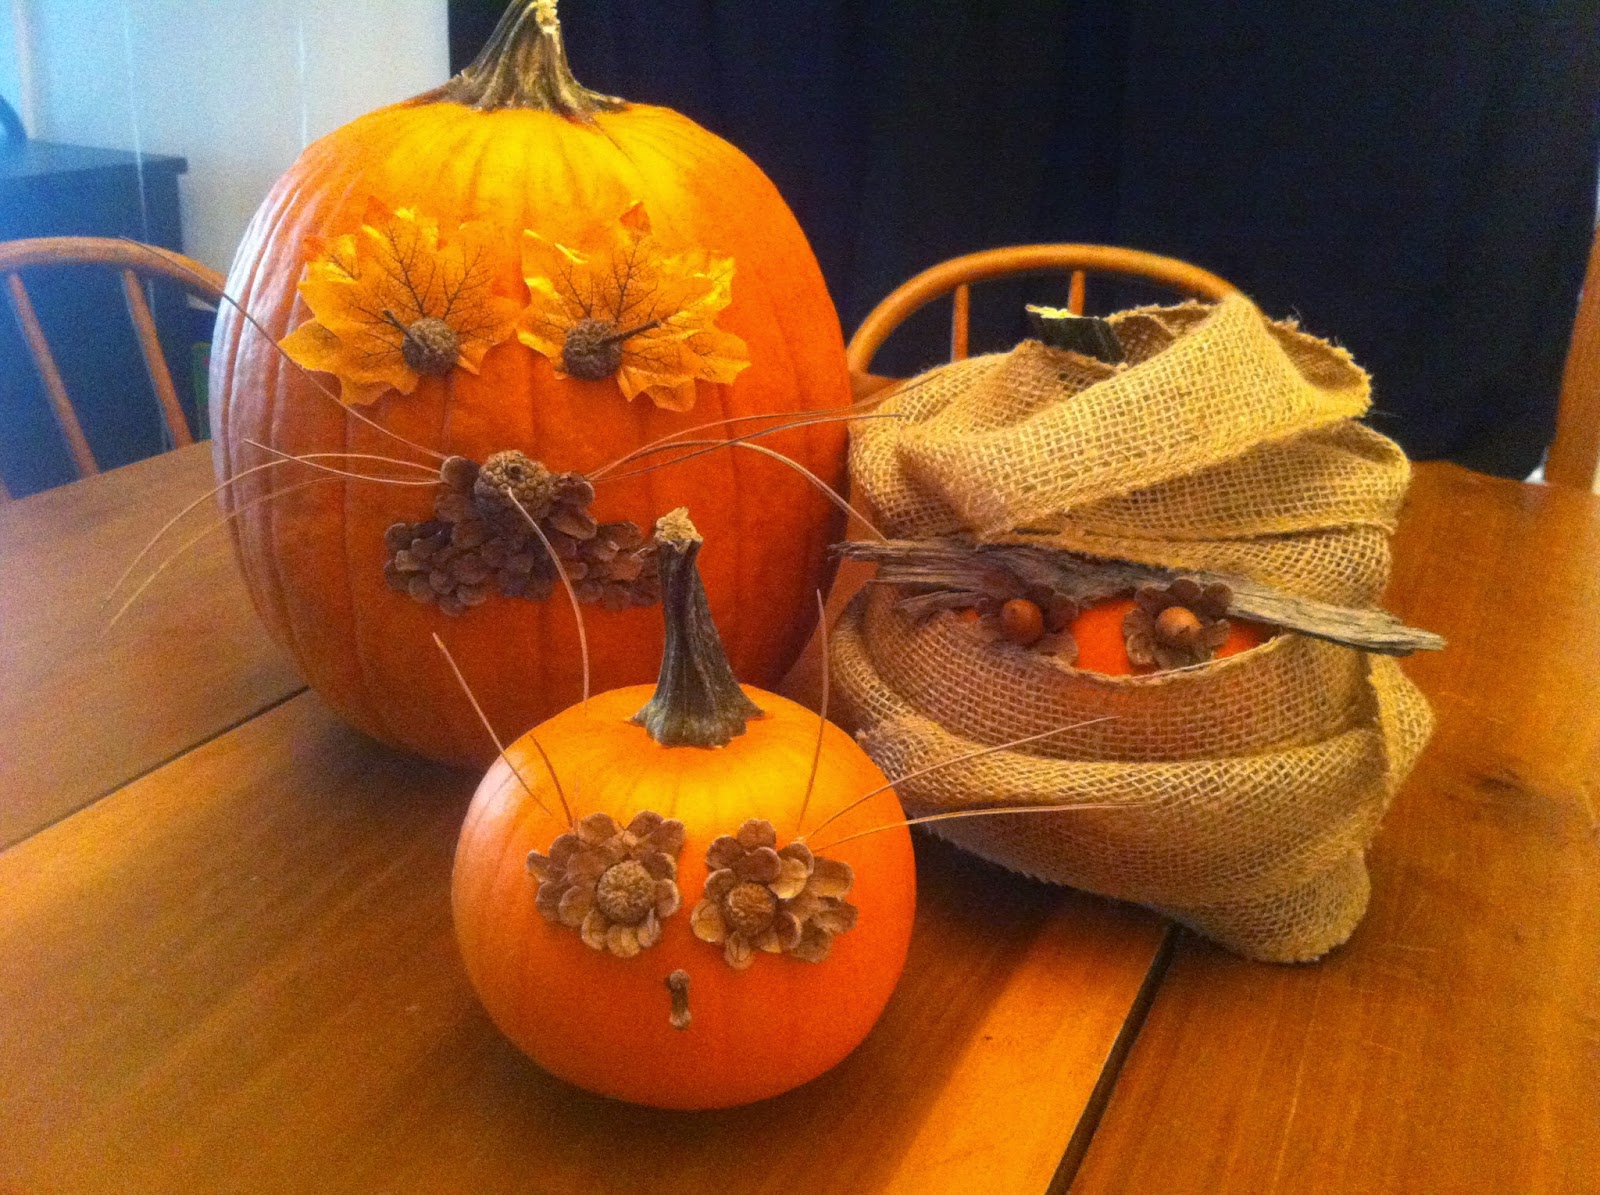
Pumpkin Pals Craft

Pumpkin Pals Craft


You will need pumpkins, a glue gun and glue, and pinecones, pine needles, acorns, twigs, bark or anything else you can find outside in your yard.  I also used old burlap and a few silk leaves from the dollar store.

I made a lion, mummy and bird...of course you can create any creature you desire.  The object of crafts is to be creative and have fun!


It took me about 45 minutes to make these three pumpkin creatures, including the clean up.  To make them I just broke the pinecones apart and glued the pieces one at a time to the pumpkins in the desired placement along with the other natural materials I found outside.

Wednesday, October 8, 2014

Mindworks...WORKS!

Mindworks...WORKS!

If you are a Stay-at-Home-Mom, or a mom, or just a parent for that matter, work PT or FT, a student, have brain fog, or are getting older by the minute...wait that's everyone!  Well we all could use a daily dose of Mindworks from Shaklee!  It's my best friend and should be yours.  There are tons of amazing testimonials.  
Check it out on my Facebook page!  And, for every bottle of Mindworks that is sold a portion of the proceeds goes to brain research, and that's something anyone can be proud of.  Plus there is this awesome brain training software your get free called CogniFit.  To try it yourself click here: http://jberinger.myshaklee.com/us/en/shop/healthysolutions/brain/product-_p_mindworks_p_